Upsell deprecated
Introduction - What is Upsell?
OX App Suite includes a built-in Upsell feature that allows providers to increase revenue by offering additional features, packages, or expanded quotas directly through the App Suite user interface. The Upsell process is highly customizable and can be easily managed by configuring the App Suite UI and Middleware.
For example, if a user is initially provisioned to access only basic Webmail features (like Mail and Contacts), they will still see other options, such as the Calendar app, in the interface. Similarly, calendar-related actions, like "Invite to appointment," will be visible in mail actions. When the user clicks on one of these actions or app icons, it initiates the Upsell flow—a dialog that prompts the user to upgrade to a paid or enhanced version of the App Suite. This process is seamless, requiring only a few clicks without the user leaving the current interface. After a simple reload, the user can immediately start using the upgraded features.
This streamlined flow is designed to minimize churn by offering a short checkout process, keeping users within the product, and enabling instant upgrades. OX Upsell provides an effective way to monetize App Suite and effortlessly transition users to paid products.
Upsell Triggers – Your Key Selling Point
Upsell triggers are the points in the interface where the upsell process is initiated. As mentioned in the previous example, this can occur when a user clicks on an app or attempts to perform an action that isn’t included in their current package.
To increase visibility of these offers, upsell triggers are placed in various locations throughout the user interface. These triggers can be customized with localized text and icons to better align with the preferences of different user groups and markets.
Configuration
Basic concepts
Upsell in OX App Suite relies on a combination of capabilities and frontend configuration. A user's capabilities, defined through the App Suite Middleware, determine which features they can access, such as calendar, carddav, or caldav. New features like AI are also controlled via capabilities (e.g., ai-service). In a default setup, if a capability is missing, the user won't see the corresponding app or feature in the frontend, nor will they be able to access it through APIs (e.g., Calendar sync with external clients).
When upsell is enabled for a capability, the App Suite frontend displays the app or feature to the user, marked with a special icon. These elements then serve as upsell triggers.
A typical example of this is a product with two tiers: a free webmail solution and a full groupware offering that includes access to all groupware features. Another common scenario is offering premium add-ons within groupware, such as the OX AI-Integration.
Upsell triggers in the UI
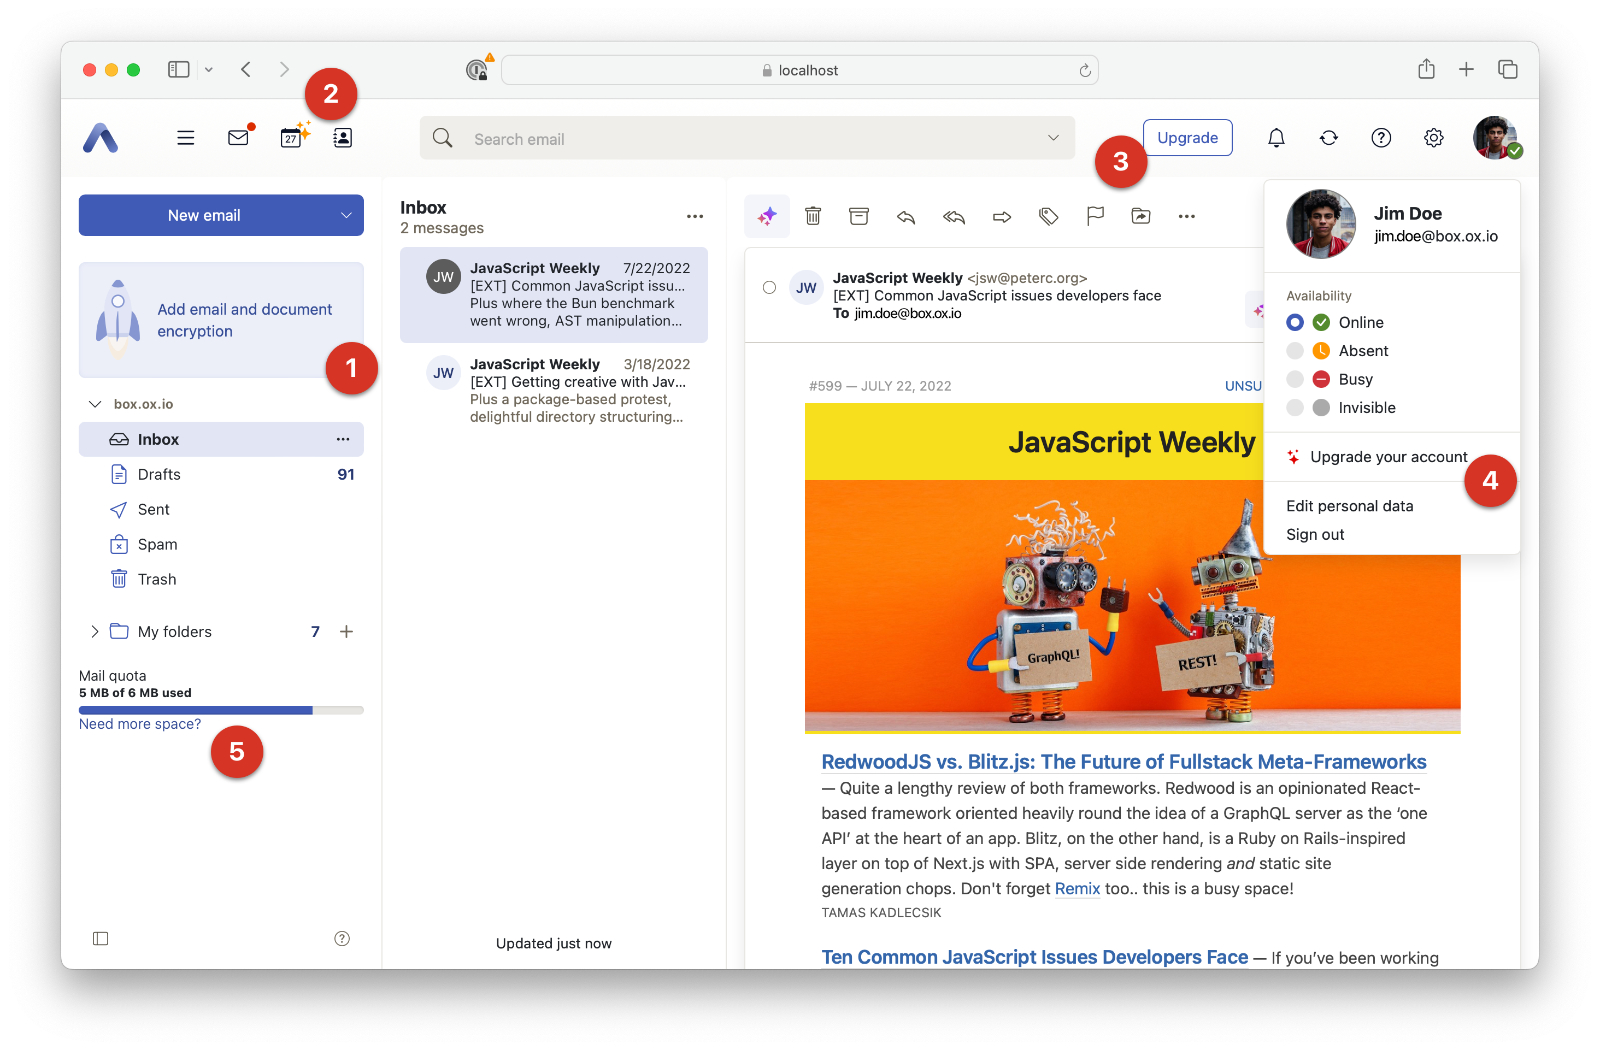
Please refer to the following screenshot (Fig. 1) for the most common upsell trigger positions in App Suite UI.
 Fig. 1: Upsell triggers
| Number | Id | Note |
|---|---|---|
| 1 | upsell/triggers/folderview/$app | Can be configured for each app (mail, calendar, contacts, drive, tasks) individually |
| 2 | n/a | Shown for any not available App, also applied in the App launcher dropdown |
| 3 | upsell/triggers/upgrade-button | One button action, independent of current App. Best for overall upgrade |
| 4 | upsell/triggers/topbar-dropdown | Shows up in the account drop down for the user |
| 5 | upsell/triggers/mail-folderview-quota, upsell/triggers/files-folderview-quota | If configured, exceeding quota will show the upsell trigger below the quota bar |
What happens on click?
By default, OX Upsell is highly flexible and non-prescriptive about the actions following a click. Each click generates an event on the internal UI event hub, which can be handled by any JavaScript function running in the UI. If you're looking to build a fully customized solution, head to the Advanced Upsell section for more details.
However, there are also built-in options to enable Upsell without writing any custom code. All you need is a checkout webpage that can process the data from the UI, handle user upgrades via OX provisioning, and initiate billing events in your customer management system.
Using the built in wizard
For the simplest Upsell configuration, we’ll use the built-in wizard to open an externally hosted checkout page within the UI. When the user clicks on any upsell trigger, the external page will appear in a modal dialog, allowing the user to complete the checkout process seamlessly. (Note: Add the capability simple-wizard system wide to activate the wizard)
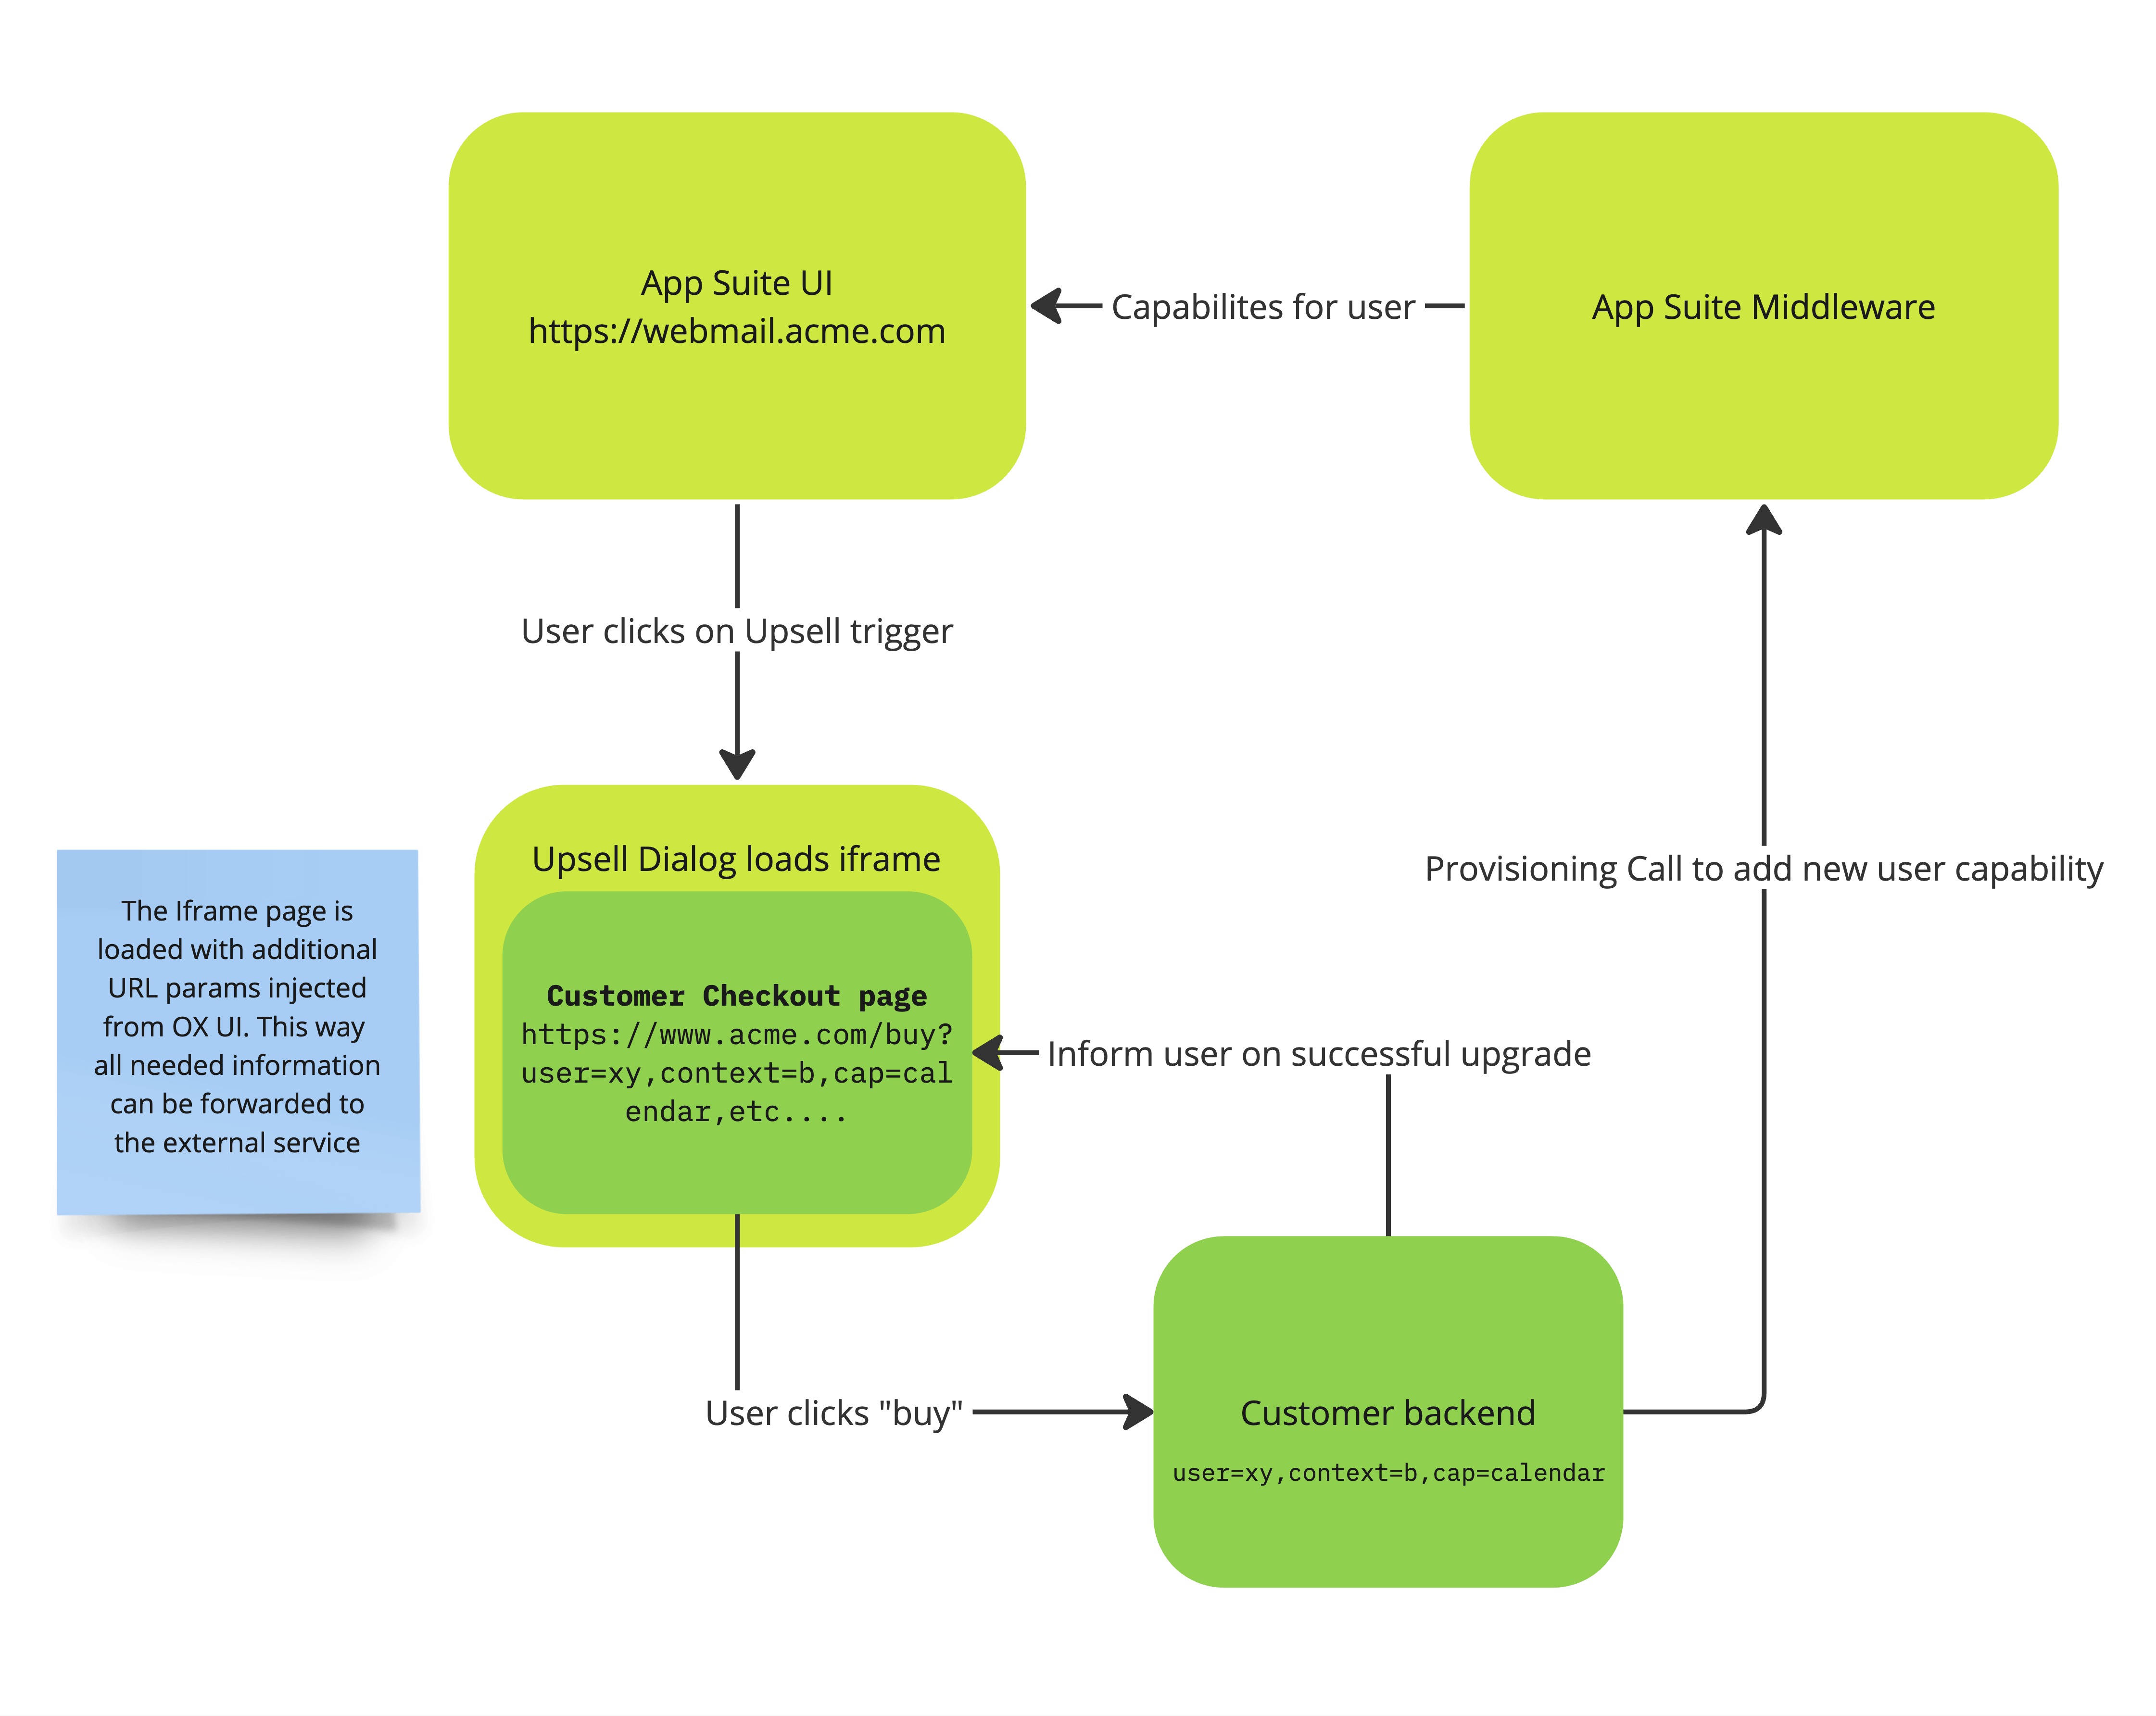
OX UI will pass all necessary data to the configurable URL, ensuring that your system has everything it needs to identify the user and offer a smooth checkout experience. Once the user completes the purchase, your system must update the user’s capabilities by making a provisioning call to the App Suite Middleware. (See Fig. 2 below for reference)
 Fig. 2: Upsell flow
Example configuration #1
Scenario: Upsell enabled for all users that do not have the capability calendar, using upgrade button and folderview. Opening a check out page after click on the Calendar App icon (or any action bound to calendar), the upgrade button and the folder view elements.
# enable upsell
io.ox/core//upsell/activated: true          # 1
# disable upsell on smartphone, e.g. your landing pages don't work on mobile (yet)
io.ox/core//upsell/activated-on-smartphone: false

io.ox/core//upsell/enabled/calendar: true   # 2

io.ox/core//upsell/triggers:
  upgrade-button:                           # 3
    enabled: true
    requires: 'calendar'
  folderview:
    mail:
      enabled: true
      requires: 'calendar'
      i18n:                                 # 4
       en_US:
        title: 'Get the Calendar App!'
       de_DE:
        title: 'Hol' dir die Kalender App!''
    contacts:
      enabled: true
      requires: 'calendar'
      i18n:
       en_US:
        title: 'Get the Calendar App!'
       de_DE:
        title: 'Hol' dir die Kalender App!''


plugins/upsell/simple-wizard:               # 5
  closeButton: true
  zeroPadding: true
  width: 750
  height: 400
  overlayOpacity: 0.5
  overlayColor: '#000'
  url: 'https://shop.acme.com/upgrade?user=$user,user_id=$user_id,context_id=$context_id,language=$language,type=$type,id=$id,missing=$missing,hostname=$hostname#session=$session'
Let's go through this example and the marked lines
- Upsell can be turned on and off via this global switch
- Each capability that should be activated for Upsell must be set to true
- Every Upsell trigger that should be visible must also be turned on via the
enabledflag - Upsell triggers that use a text label, can be customized and localized. Set all strings for each locale (or language) needed in your installation via the pattern
io.ox/core//upsell/triggers/$feature/i18n/$locale/title - Wizard configuration: The wizard can be customized in width, height and inner paddings to let your website fit the best when loaded
As you might see, the used URL in the checkout process can make use of variable placeholders, depending which information is useful for your checkout subsystem. All variables starting with $ sign will be filled at runtime by the UI. A real URL for a user could then look like this during upsell: https://shop.acme.com/upgrade?user=john.doe,user_id=1,context_id=1,language=en_US,type=app,id=io.ox%2fcalendar,missing=calendar,hostname=www.webmail.acme.come#session=123456
You are free to change the URL pattern and the used variables to your needs, e.g.:
https://shop.acme.com/upgrade?user=$user_id&context=$context_id&someParam=true&action=webmailUpsell
Reference for simple wizard URL variables
| Variable | Value |
|---|---|
$user | User name |
$user_id | User ID |
$context_id | User context ID |
$language | User's UI language |
$type | Type of the used trigger, one of app, inline-action, custom. Useful for measuring conversion rates of triggers |
$id | ID of the upsell trigger in the UI |
$missing | The missing capabilities for the user that triggered this action |
$hostname | Hostname of the current UI. Useful when using multiple brands/domains |
$session | The current user's session ID |
Example configuration #2
A more advanced case with different upsell triggers and capabilities. Note, also complex combinations of capabilities can be defined as boolean expressions
io.ox/core//upsell/activated: true

io.ox/core//upsell/enabled:
  calendar: true
  infostore: true
  caldav: true
  carddav: true
  ai-service: true

io.ox/core//upsell/triggers:
  upgrade-button:
    enabled: true
    requires: 'carddav && caldav'   #1
  folderview:
    mail:
      enabled: true
      requires: 'ai-service'        #2
      i18n:
       en_US:
        title: 'Try our new AI-Integration'
       de_DE:
        title: 'Probier unsere KI aus'
    contacts:
      enabled: true
      requires: 'calendar'
      i18n:
       en_US:
        title: 'Get the Calendar App!'
       de_DE:
        title: 'Hol' dir die Kalender App!''
    tasks:
      enabled: true
      requires: 'infostore'
      i18n:
       en_US:
        title: 'Upgrade to online storage'
       de_DE:
        title: 'Nutzen sie unseren Cloud-Speicher'
This example makes use of some different capabilities.
- It's possible to use boolean expressions (as strings) in the
requiresconfiguration. E.g.carddav && caldavwill check for both capabilities. You can use!, &&, ||, ( )in your statements if needed. - The OX AI-Service is Upsell ready, although it's a distinct service running in your stack. Please note that the feature toggle for the AI-Service also needs to be activated:
io.ox/core//features/ai = true. For more details on upselling the AI-Service take a look at the latest AI-Service documentation.
Using Upsell with your own implementation
If you prefer not to use the simple wizard for your custom Upsell flow, you can create your own by executing custom code within the App Suite UI context. The App Suite UI triggers events through the global event hub, exposed through the ox module, which you can monitor and respond to. This approach provides maximum flexibility and control over your Upsell flow, tailored to your specific needs.
Example code for listening to Upsell events
import ox from './ox.js'

ox.on('upsell:requires-upgrade' (event) => {
  // event is an object like
  // {
  //   id: "io.ox/files",
  //   missing: "infostore",
  //   type: "app"
  // }

  // pass the data to your upsell handling code
  // e.g. show a modal dialog that takes the user
  // to the customer center where he can purchase the
  // upgrade or feature
  openCustomCheckoutPage(event)
})
Writing Upsell Conditions
In the example above, you might have already seen upsell conditions. Whenever you see a requires, it is followed by a condition. For example:
requires: infostore
This is a simple condition — it’s shorthand for: yaml requires: has(infostore)
If you provide multiple space-separated capabilities, such as: yaml requires: mail_export infostore this is shorthand for: yaml requires: has(mail_export) && has(infostore)
Upsell triggers
Conditions for upsell triggers work slightly differently. Instead of checking whether a capability/feature is present, they check whether it is missing but available for upsell.
condition: infostore || guard
# is shorthand for
condition: upsell(infostore) || upsell(guard)
Plans
Upsell triggers can also make use of plans. A plan is a predefined condition that can be reused across multiple upsell triggers.
Plans are defined as UI settings in the io.ox/core namespace. Each plan has an ID and a condition.
Example:
uiSettings:
  io.ox/core//upsell/plans/packageA/condition: `webmail`
  io.ox/core//upsell/plans/packageB/condition: `infostore && !guard`
  io.ox/core//upsell/plans/packageC/condition: `infostore && guard`
The condition of a plan evaluates what the user already has. Upsell triggers can then target users belonging to specific plans.
uiSettings:
  io.ox/core//upsell/triggers/upgrade-button/condition: 'plan(packageA) || plan(packageB)'
Boolean operators and functions
Conditions support the following boolean operators and functions:
| Operator/Function | Description |
|---|---|
&& | Boolean AND |
| `\ | \ |
! | Boolean NOT |
( ) | Parenthesis for grouping |
has(...) | True if the user currently has the capability/feature |
lacks(...) | True if the user currently does not have the capability/feature |
available(...) | True if the user currently has the capability/feature or it's upsell-eligible |
upsell(...) | True if the user currently lacks the capability/feature and it's upsell-eligible |
plan(planId) | True if the user has exactly that plan |
Recommendation
If you don’t need explicit functions, we recommend using shorthand conditions (e.g. mail_export && infostore) to check for features. Apply the same shorthand style for upsell triggers.
Just keep in mind that the semantics differ slightly: * For features, conditions check whether a capability/feature is already present or available for upsell. * For upsell triggers, conditions check whether a capability/feature can trigger an upsell — meaning it is not currently present, but is available through upsell.
