OAuth 2.0 Provider deprecated
Certain APIs of OX App Suite can be accessed by clients via OAuth, with access tokens issued by an external authorization server. In terms of RFC 6749 the App Suite backend acts as resource server and every user is a resource owner, while the external authorization server is the OAuth provider.
The feature as a whole is contained in separate optional packages/features and requires some configuration. Supported client applications must be of type confidential according to the web application profile defined in RFC 6749. The OX middleware will act as resource server.
Configuration
The OAuth provider feature is bundled into the open-xchange-oauth-provider package which is already included in the core-mw image. The package can be enabled in your chart's values.yaml:
core-mw:
  packages:
    status:
      open-xchange-oauth-provider: enabled
Configuration takes place in /opt/open-xchange/etc/oauth-provider.properties. OAuth integration is deactivated by default and must be activated manually through
com.openexchange.oauth.provider.enabled = true
The following section will describe the configuration modes in detail along with providing a basic Keycloak example setup.
See here for a list containing all available settings for App Suite middleware.
Operation Mode
To validate incoming requests that have been authorized by the external authorization server, tokens can either be passed as JWT (expect_jwt), or as opaque bearer tokens (token_introspection). Which mode is used can be configured via
com.openexchange.oauth.provider.mode = expect_jwt
Each mode comes with its own mode-specific settings, which are outlined below.
JSON Web Token (JWT)
If you want to use an external Identity and Access management System that issues JWTs this must be configured accordingly. To do this, com.openexchange.oauth.provider.mode needs to be set to expect_jwt:
com.openexchange.oauth.provider.mode = expect_jwt
From the provided JWT, the authenticated user needs to be derived based on the values from certain claims - see User Resolution below.
To validate the incoming JWTs, it is necessary to specify where the required signature keys should be fetched from. There are two possible configurations, which are configured via com.openexchange.oauth.provider.jwt.jwksUri. It is possible to retrieve the required JSON Web Key Set (JWKS) from a JWKS endpoint, provided by the Identity and Access Management System, or a local JSON file containing these keys. Which mechanism is used to load the JWKS is determined by the given URI scheme. Supported are http/https and file.
The first option is to retrieve them from a JWKS endpoint. e.g.:
com.openexchange.oauth.provider.jwt.jwksUri = http://127.0.0.1:8083/realms/demo/protocol/openid-connect/certs
The second is to load them from a local JSON file, for example:
com.openexchange.oauth.provider.jwt.jwksUri = file:/Users/foo/core/com.openexchange.oauth.provider.impl/conf/jwk.json
This should point to a locally accessible JSON file that looks like in the following example: The local JSON file may look like the following example:
    {
       "keys":[
          {
             "kid":"bY_yOOTU67iZLZaV79y2TLIxhEF4J9ZTVbTT98kUOSU",
             "kty":"RSA",
             "alg":"RS256",
             "use":"sig",
             "n":"s0I2jbv48n8KkFl3IiMHxwhK7QRrenlDwUpr9dPRAYIahDo4zXrGyRnxaJ3hQ6Q32E9L7L8_JjrOm
             jtIuvxOeG7wKQV-mVk0zkF5NDfwDuRTIj2XPIVAhLbsI3EK8RMjGjzCt7vTa5VMZKXXhV_KwUgIEBWlPma
             8z925Sjb85ilZnzhAikeLLKXIXNJyGkILL19o6Apy38N7Ma6WAwJfIX5YjbTNIfRywQAyParivsl0TVo-9
             cTsrq0ApAe-4rJElWXC0nGu5P7uI6b7KYD_c4wP9Om2AXO5Fq8O8P2vbZ3Rv4DjBsI2P7BEVm_N3-yHB2p
             LzaaMqldNRClgfid53Q",
             "e":"AQAB",
             "x5c":[
                "MIIClzCCAX8CBgF1Y9QwMDANBgkqhkiG9w0BAQsFADAPMQ0wCwYDVQQDDARkZW1vMB4XDTIwMTAyNj
                A3MzIzMVoXDTMwMTAyNjA3MzQxMVowDzENMAsGA1UEAwwEZGVtbzCCASIwDQYJKoZIhvcNAQEBBQADg
                gEPADCCAQoCggEBALNCNo27+PJ/CpBZdyIjB8cISu0Ea3p5Q8FKa/XT0QGCGoQ6OM16xskZ8Wid4UOk
                N9hPS+y/PyY6zpo7SLr8Tnhu8CkFfplZNM5BeTQ38A7kUyI9lzyFQIS27CNxCvETIxo8wre702uVTGS
                l14VfysFICBAVpT5mvM/duUo2/OYpWZ84QIpHiyylyFzSchpCCy9faOgKct/DezGulgMCXyF+WI20zS
                H0csEAMj2q4r7JdE1aPvXE7K6tAKQHvuKyRJVlwtJxruT+7iOm+ymA/3OMD/TptgFzuRavDvD9r22d0
                b+A4wbCNj+wRFZvzd/shwdqS82mjKpXTUQpYH4ned0CAwEAATANBgkqhkiG9w0BAQsFAAOCAQEAcRV+
                /+wDhar7NeaRgvy42UoD9D36y5AYYlZCiwgU2eGciKMVEsVrmaTvMNeboulWahb9bQfVRea7KjOZDeR
                Zz/X7kLNG8BytnIWOEHAKmQM9wlIa5Fr9f+Za72vKnFAllTNiKxI6LsUkD5s7Lh3JuwEfnR0hx+op9Q
                EqntCjuMU4RWlKKj7ZG3ggjJTaQhwyb+D7faZxsLbnCTRcUdbgKRsTiS3wTlHfCM3UqcElNMME2MoGr
                d1IQs9KDIj0vcsjTUpUss6OqqfAjSsut4A1q47bY7QOb2kq9Tmlhy/4idu49+NB0F4kshvaC1mLmYJH
                ZjruXG//CqeQnq/BFk0PmQ=="
             ],
             "x5t":"1fMYDHQJ9DCIJh8OTszMRVx0Rfg",
             "x5t#S256":"d_ms-okav_ldmeWLQJwemeKIveOyvR9R3P_fNHLTp58"
          }
       ]
    }
Furthermore the allowed token issuers can be specified. If you do not configure this property, tokens are accepted from all issuers.
com.openexchange.oauth.provider.allowedIssuer
Token Introspection
To be able to validate opaque OAuth Access Tokens issued by an external Identity and Access management System via token introspection you need a proper configuration. Therefore, com.openexchange.oauth.provider.mode must be set to token_introspection:
com.openexchange.oauth.provider.mode = token_introspection
Afterwards, the introspection endpoint must be defined from which information about the received token is retrieved. This property is mandatory if you want to use token introspection. Example:
com.openexchange.oauth.provider.introspection.endpoint = http://127.0.0.1:8083/realms/demo/protocol/openid-connect/token/introspect
If HTTP Basic Auth is supposed to be used for the token information request, this must be configured via the following configuration properties:
com.openexchange.oauth.provider.introspection.basicAuthEnabled = true
com.openexchange.oauth.provider.introspection.clientID = MyClient
com.openexchange.oauth.provider.introspection.clientSecret = bef75a68-f3d8-499c-8c0a-65155de13dbb
The token introspection endpoint should respond with a JSON object that contains information about the user, among other things. The resolution of this user is configurable, see User Resolution below.
User Resolution
In order to derive the actual App Suite user and context - either from the claims in the received JWT (in mode expect_jwt), or from the token introspection result (in mode token_introspection) - a couple of further properties can be configured.
First, the names of the claim / JSON field where the context- and user information is found needs to be specified with the following configuration properties (based on the given example this would be email for both properties):
com.openexchange.oauth.provider.contextLookupClaim = email
com.openexchange.oauth.provider.userLookupClaim = email
How the queried values are subsequently processed and resolved is configured as follows. To lookup the context from the provided claim or JSON value, the property com.openexchange.oauth.provider.contextLookupNamePart can be configured to one of these three options:
full: The full string as returned by the authorization server.local-part: The local part of an email address (local-part@domain), if the provided name matches such. In case the name does not match an email address, the full string is taken.domain(default): The domain part of an email address (local-part@domain), if the provided name matches such. In case the name does not match an email address, the full string is taken.
Similarly, to derive the user from the claim or JSON value, the property com.openexchange.oauth.provider.userLookupNamePart provides these options:
full: The full string as returned by the authorization server.local-part(default): The local part of an email address (local-part@domain), if the provided name matches such. In case the name does not match an email address, the full string is taken.domain: The domain part of an email address (local-part@domain), if the provided name matches such. In case the name does not match an email address, the full string is taken.
Scope Mapping
Finally, it is possible to enable a generic, configurable scope-mapping of external authorization server scopes to internal middleware scopes via com.openexchange.oauth.provider.scope.[EXTERNAL_SCOPE]. To specify an external scope replace [EXTERNAL_SCOPE] with the corresponding external scope name, e.g.:
com.openexchange.oauth.provider.scope.mail = read_mail, write_mail.
com.openexchange.oauth.provider.scope.cal = read_calendar, write_calendar.
Provider Example: Keycloak
All steps necessary to start a Keycloak Service in Docker and make basic configurations can be found in this Keycloak on Docker guide. Additionally, if you want to persist your data, you can use one of the following docker-compose examples from the Keycloak repository.
Here is a note, for our test setup a simple test user is sufficient to issue tokens. To allow interaction, a user must be registered who is also known to the App Suite. In a real deployment, an appropriate User Storage SPI must be provided to look up users and validate credentials.
As an example, a user can look like this. 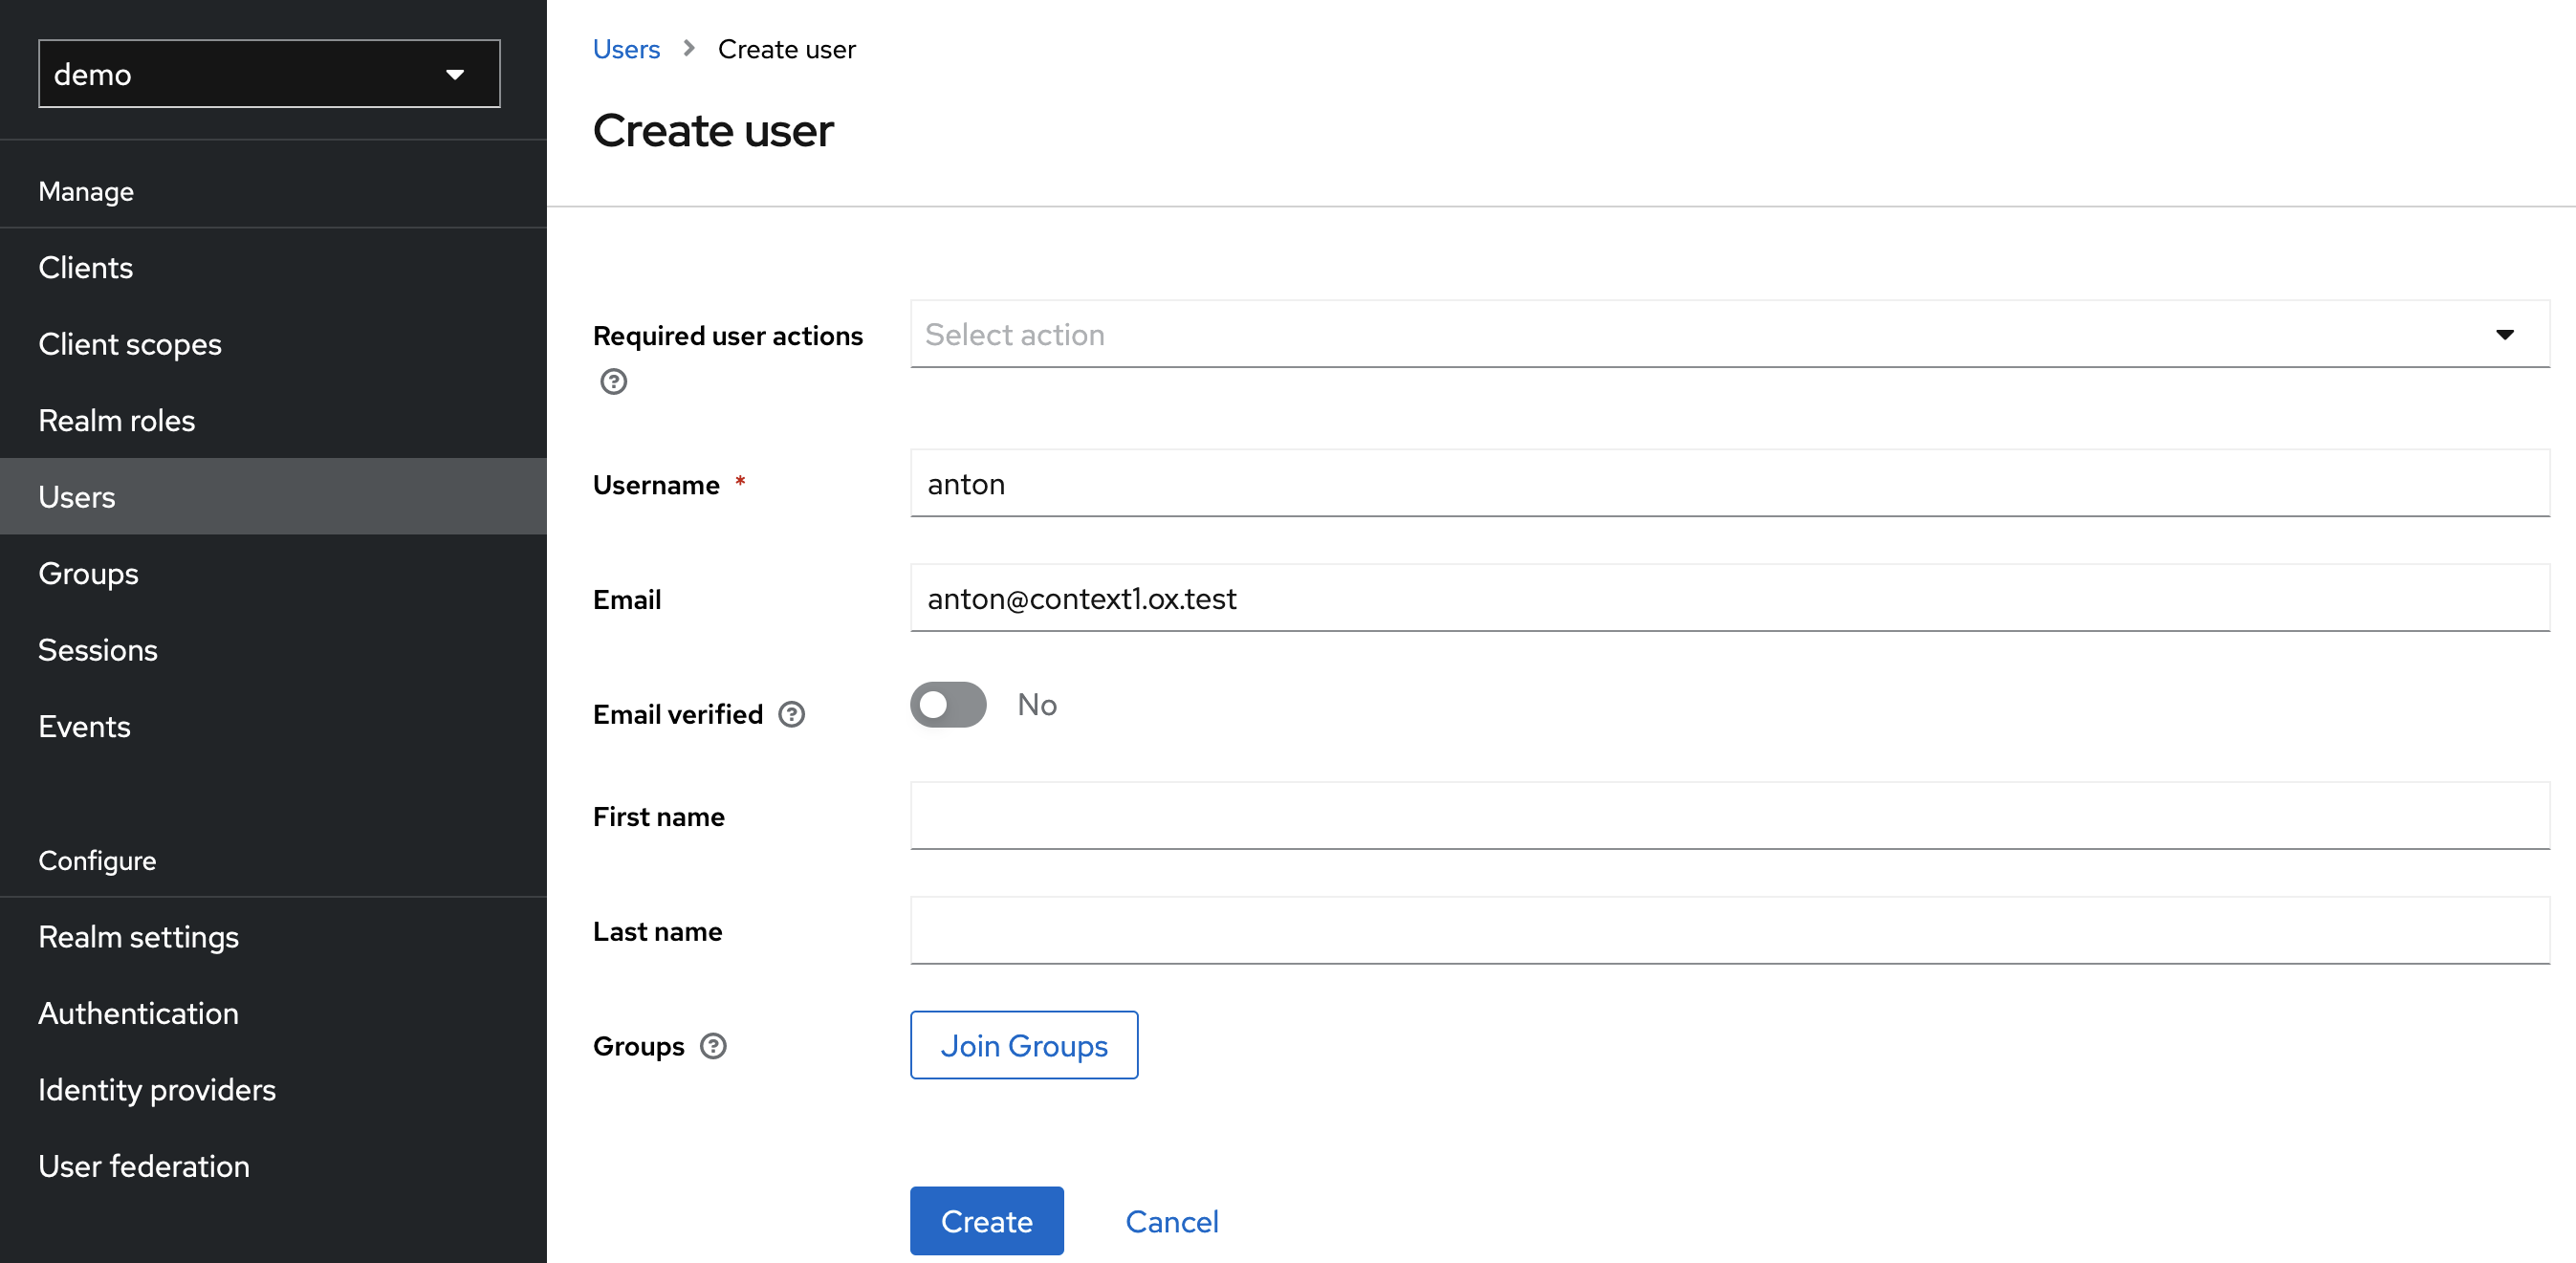
After you have successfully created your test user, you must set a password for our test purpose under Users > anton > Credentials (e. g. secret).
Step 0 (optional): Create a realm
First you can create a realm for your application or use the default realm. The examples in this document always use the 'demo' realm, but you can use whatever you choose. Just be aware that the paths of the keycloak change depending on which realm you use.
Step 1: Configure Client
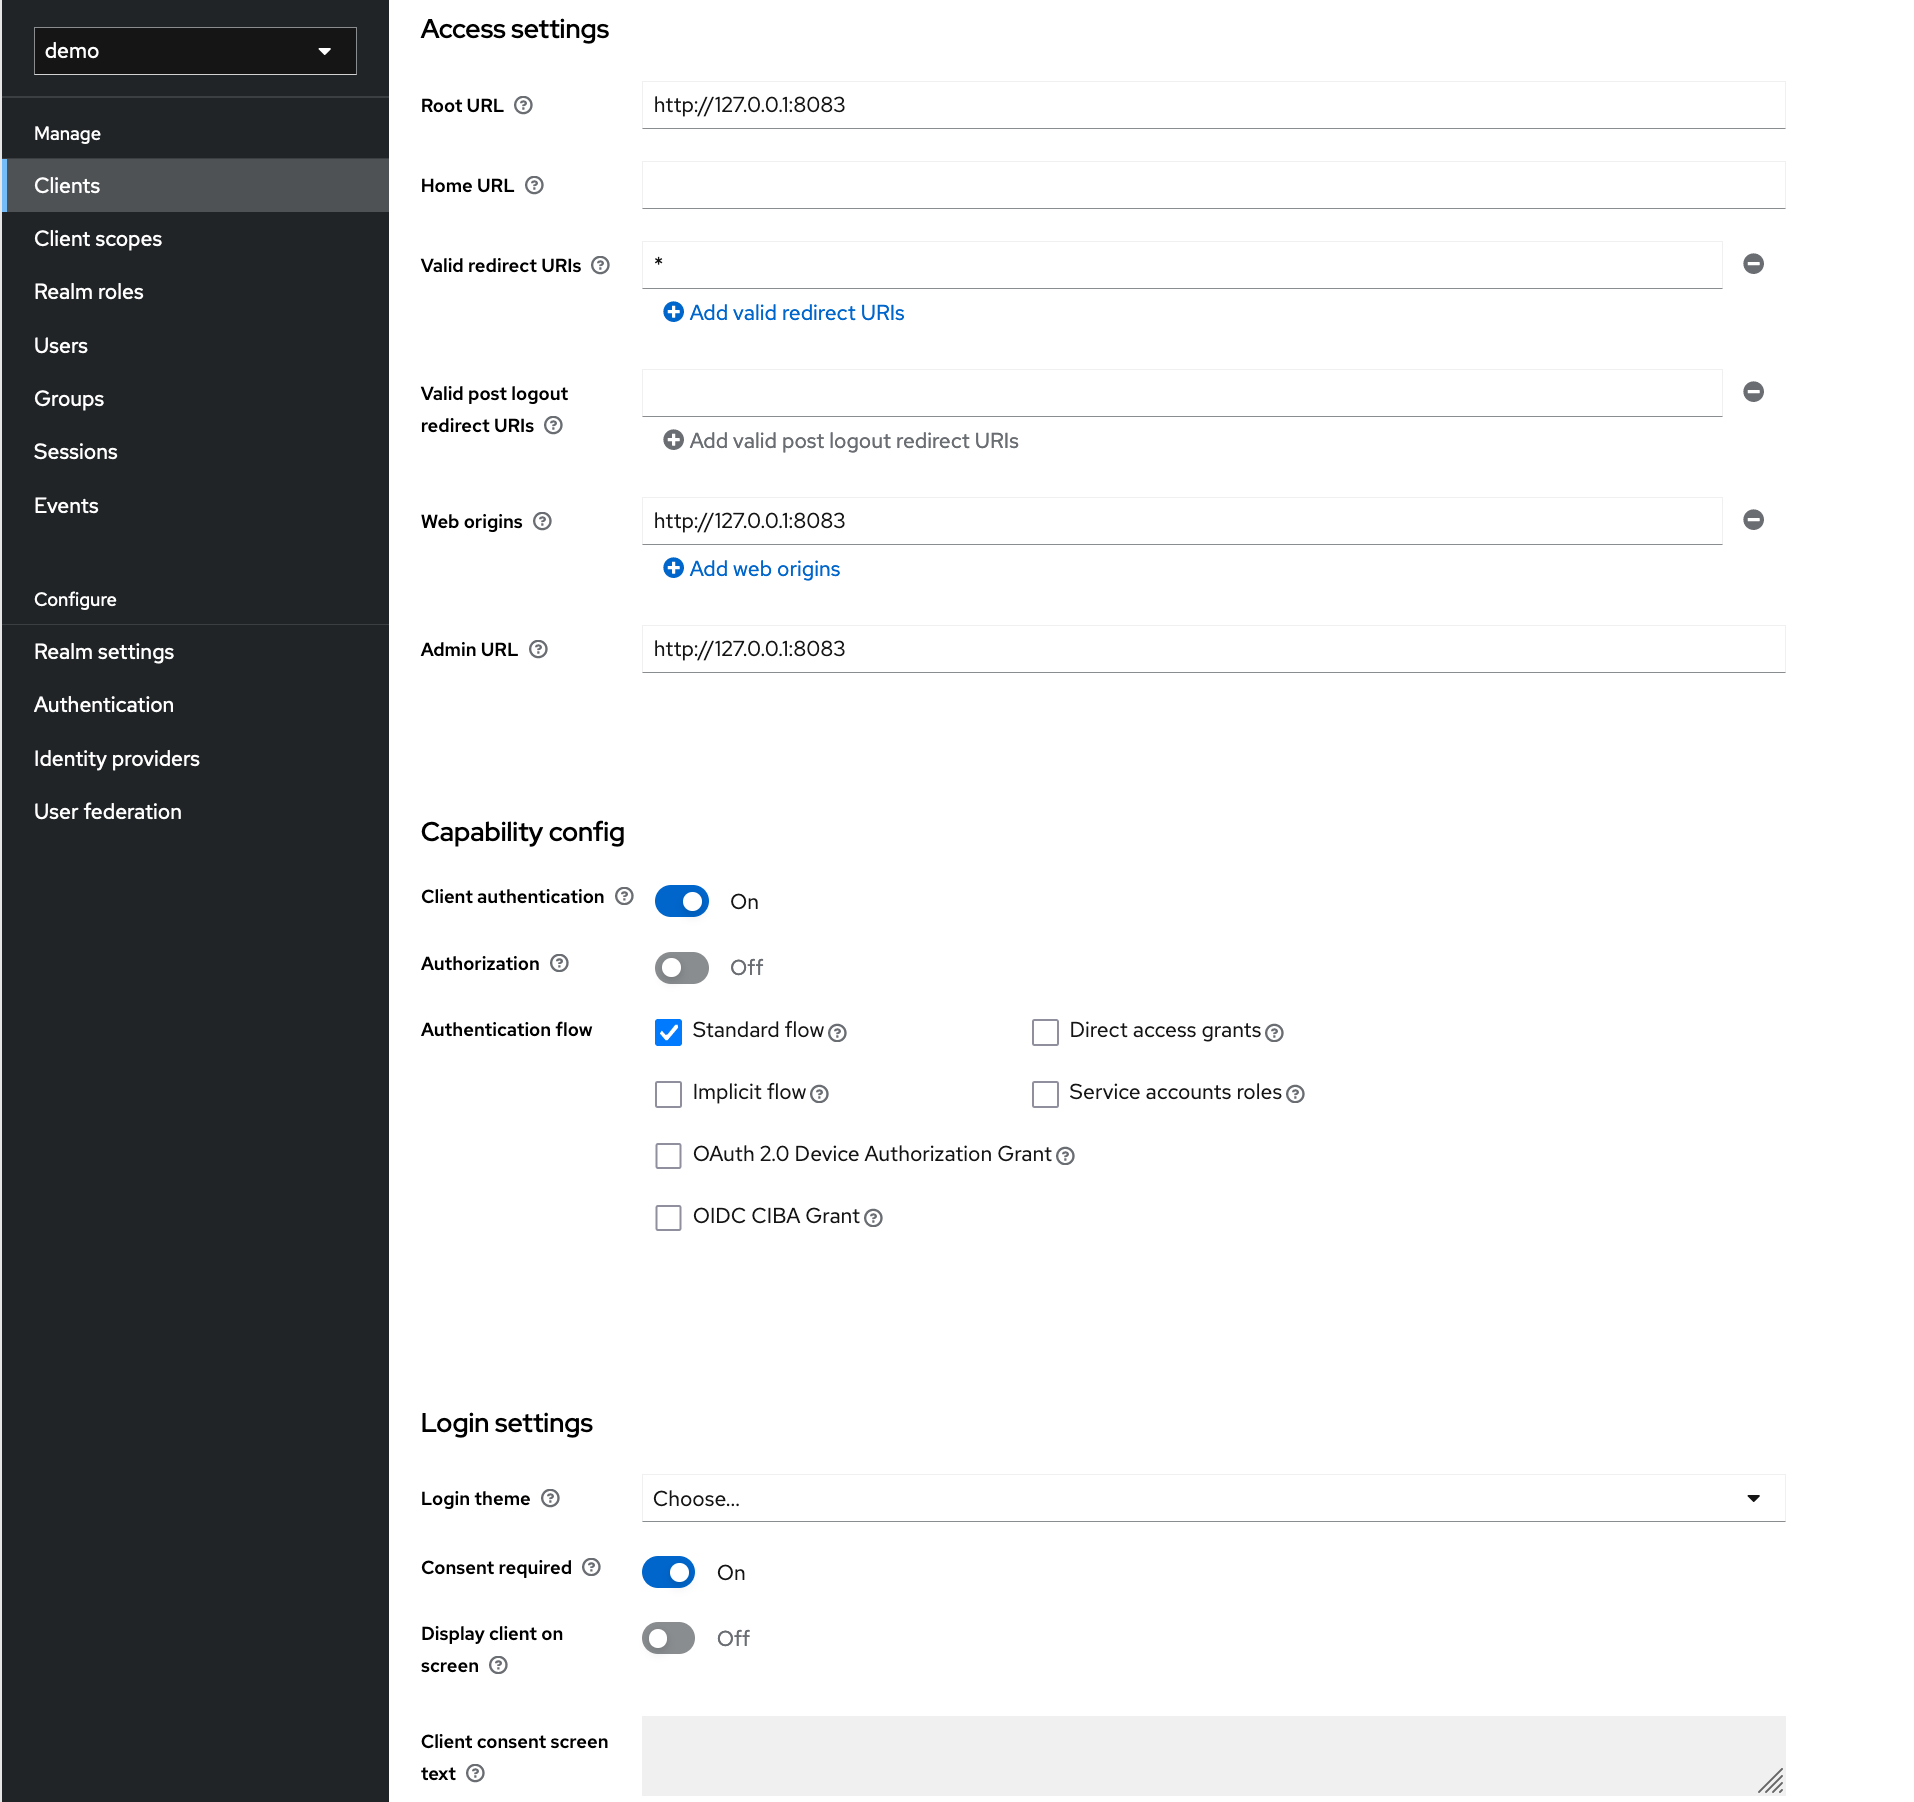
When creating the client you first need to specify a name, enable Client authentication and Standard Flow and disable Direct access grants.
The configuration of the root URL and redirect URI depends on your setup, in this example this is localhost.
After the client is created you have to enable Consent Required under Settings > Login settings.
Note: DO NOT SET WILDCARD REDIRECT URI IN PRODUCTION. Doing so creates a large security flaw.
Step 2: Create Client Scopes
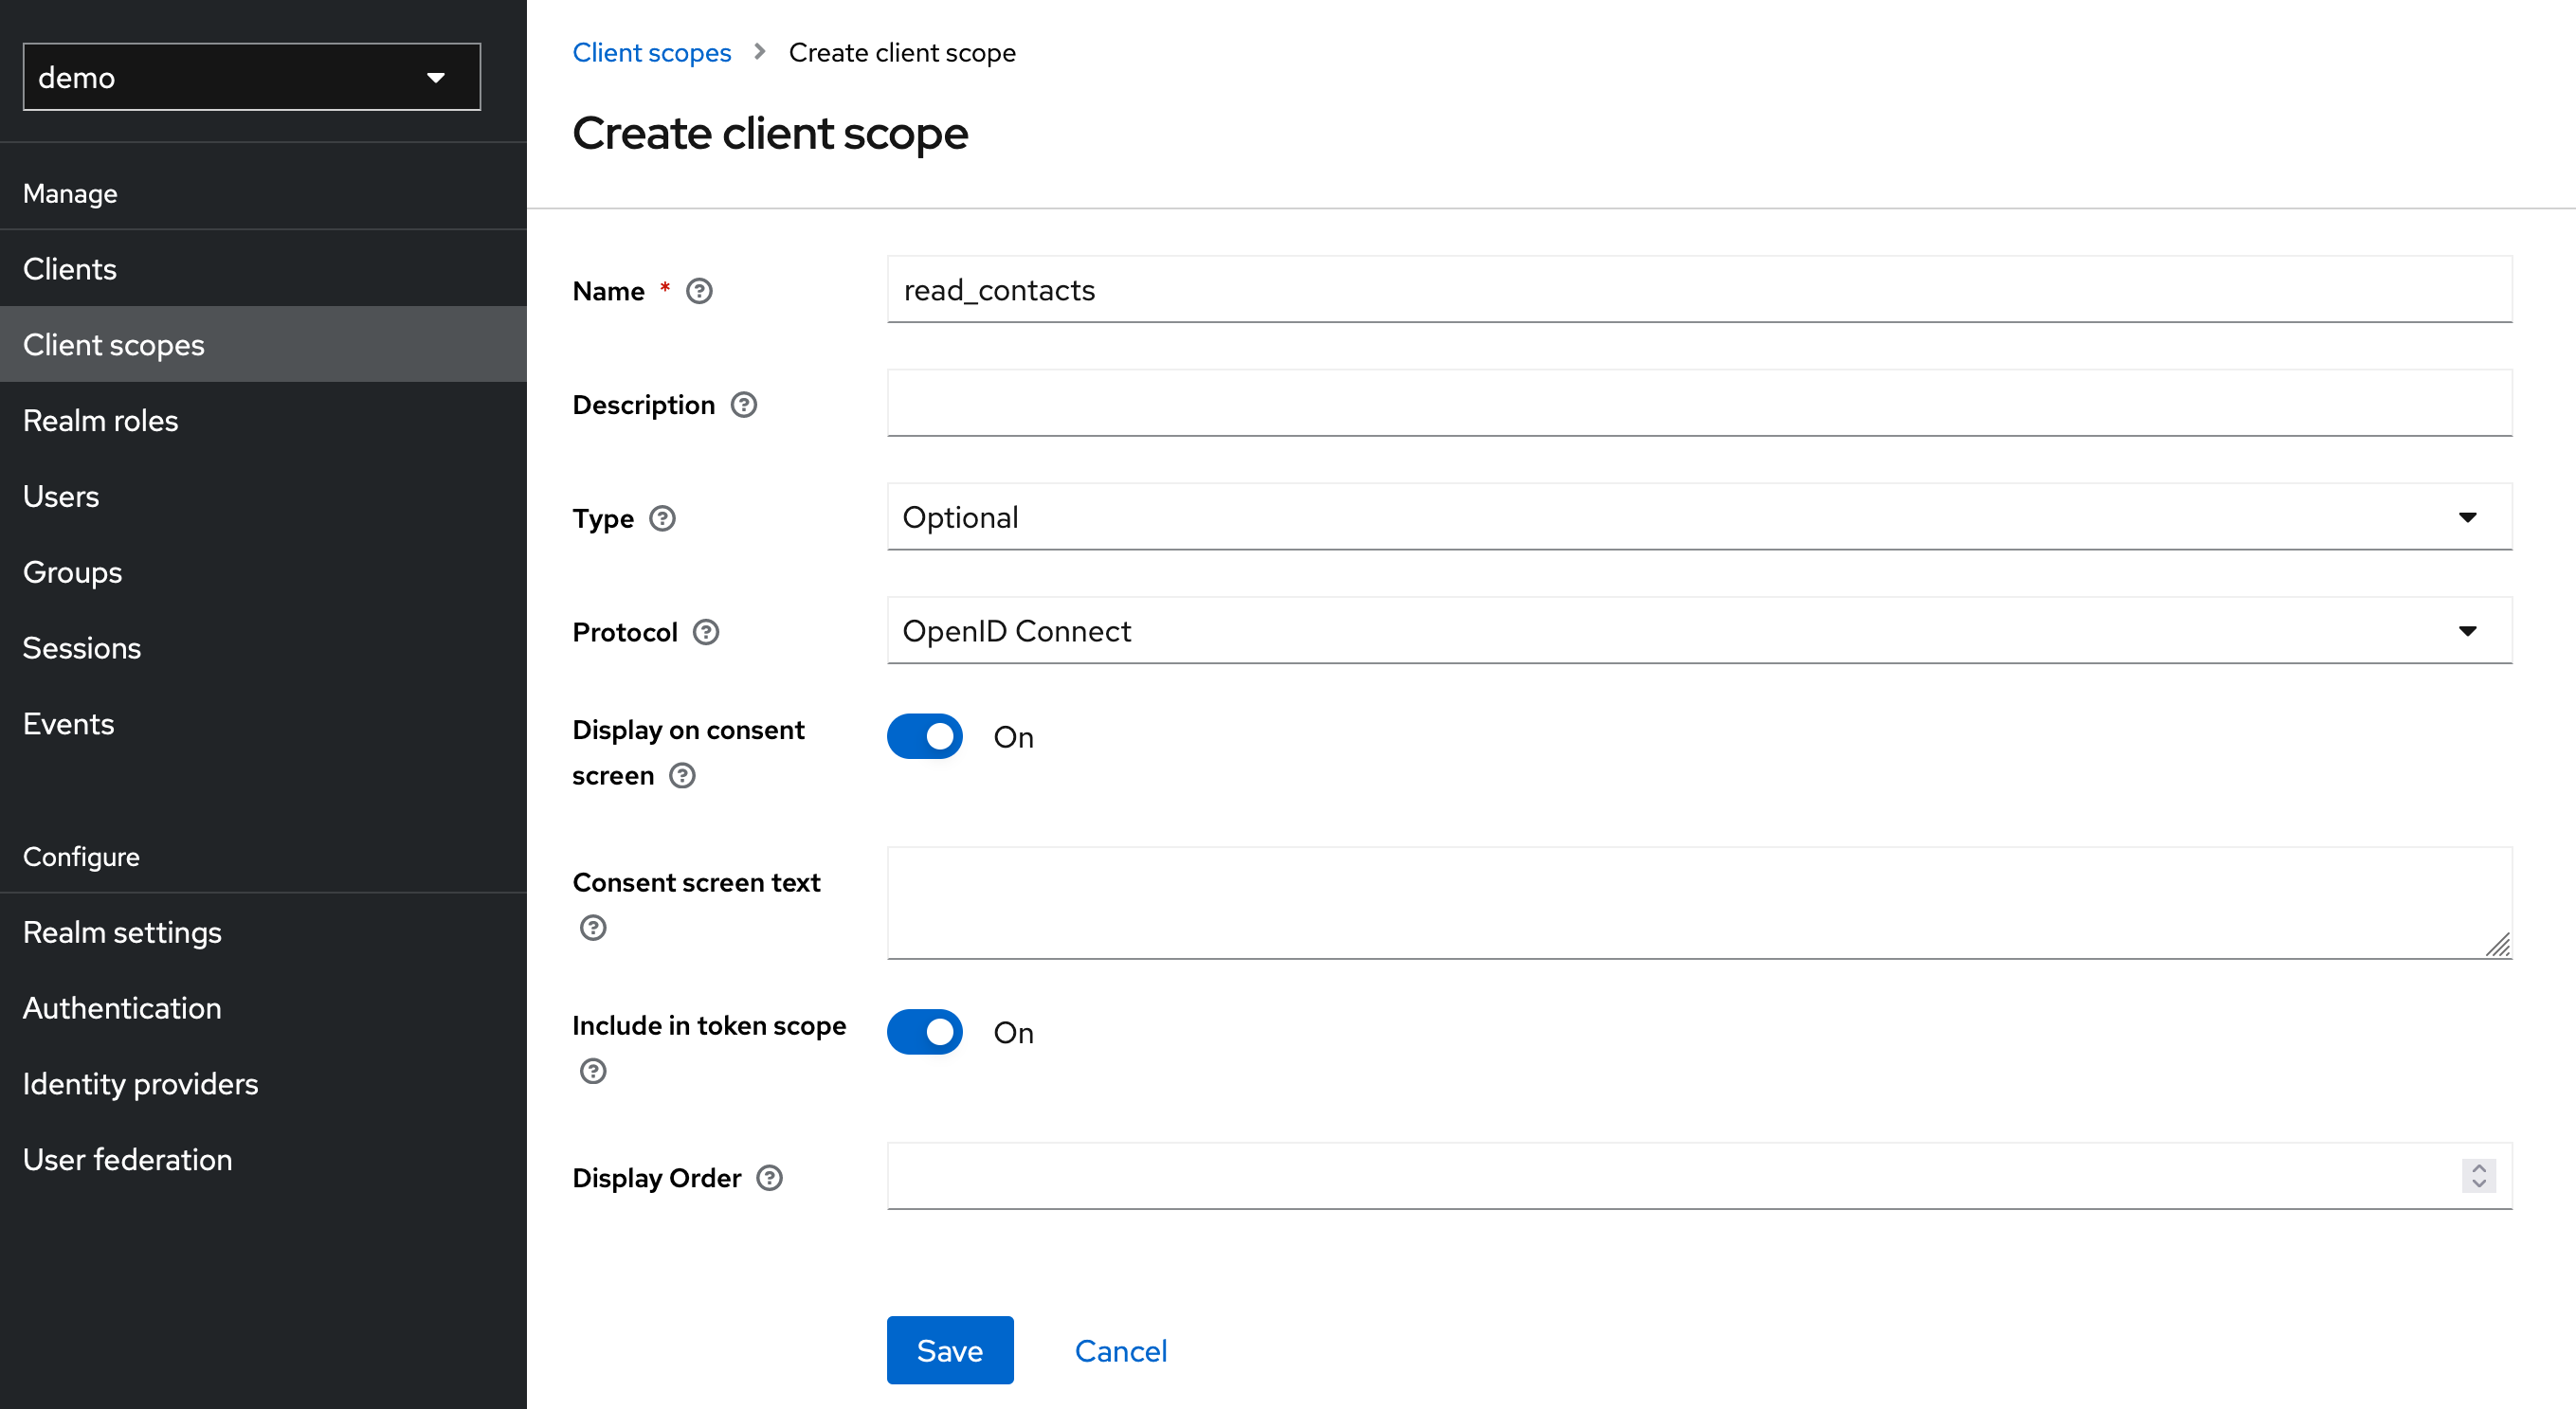
Scopes can be added in Keycloak under the Client Scopes item. For this showcase we will add the write_contacts and read_contacts scope.
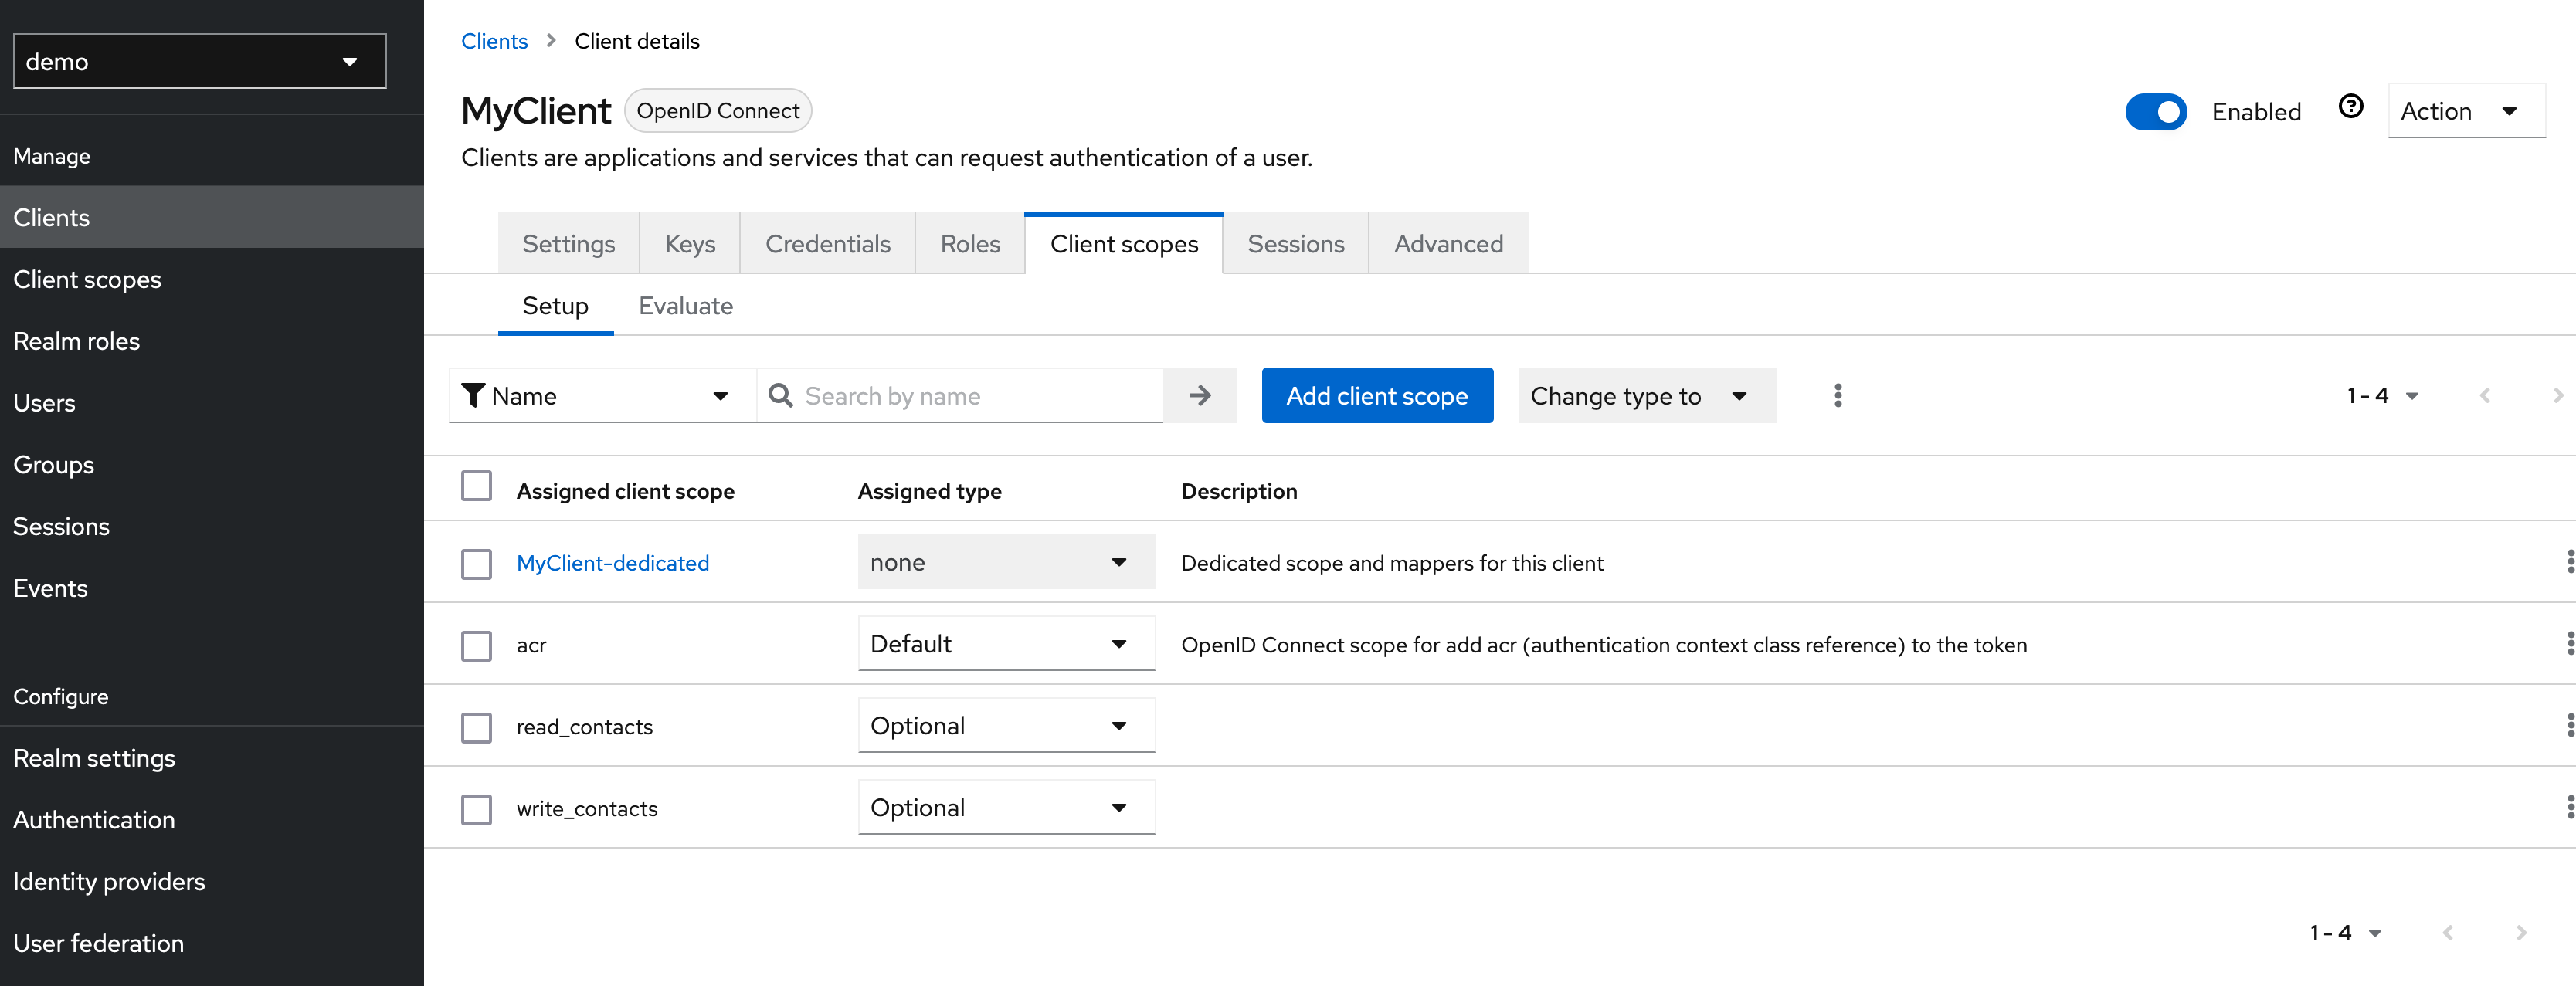
The created scopes must then be assigned to our client.
Step 3: Create Attribute Mapper
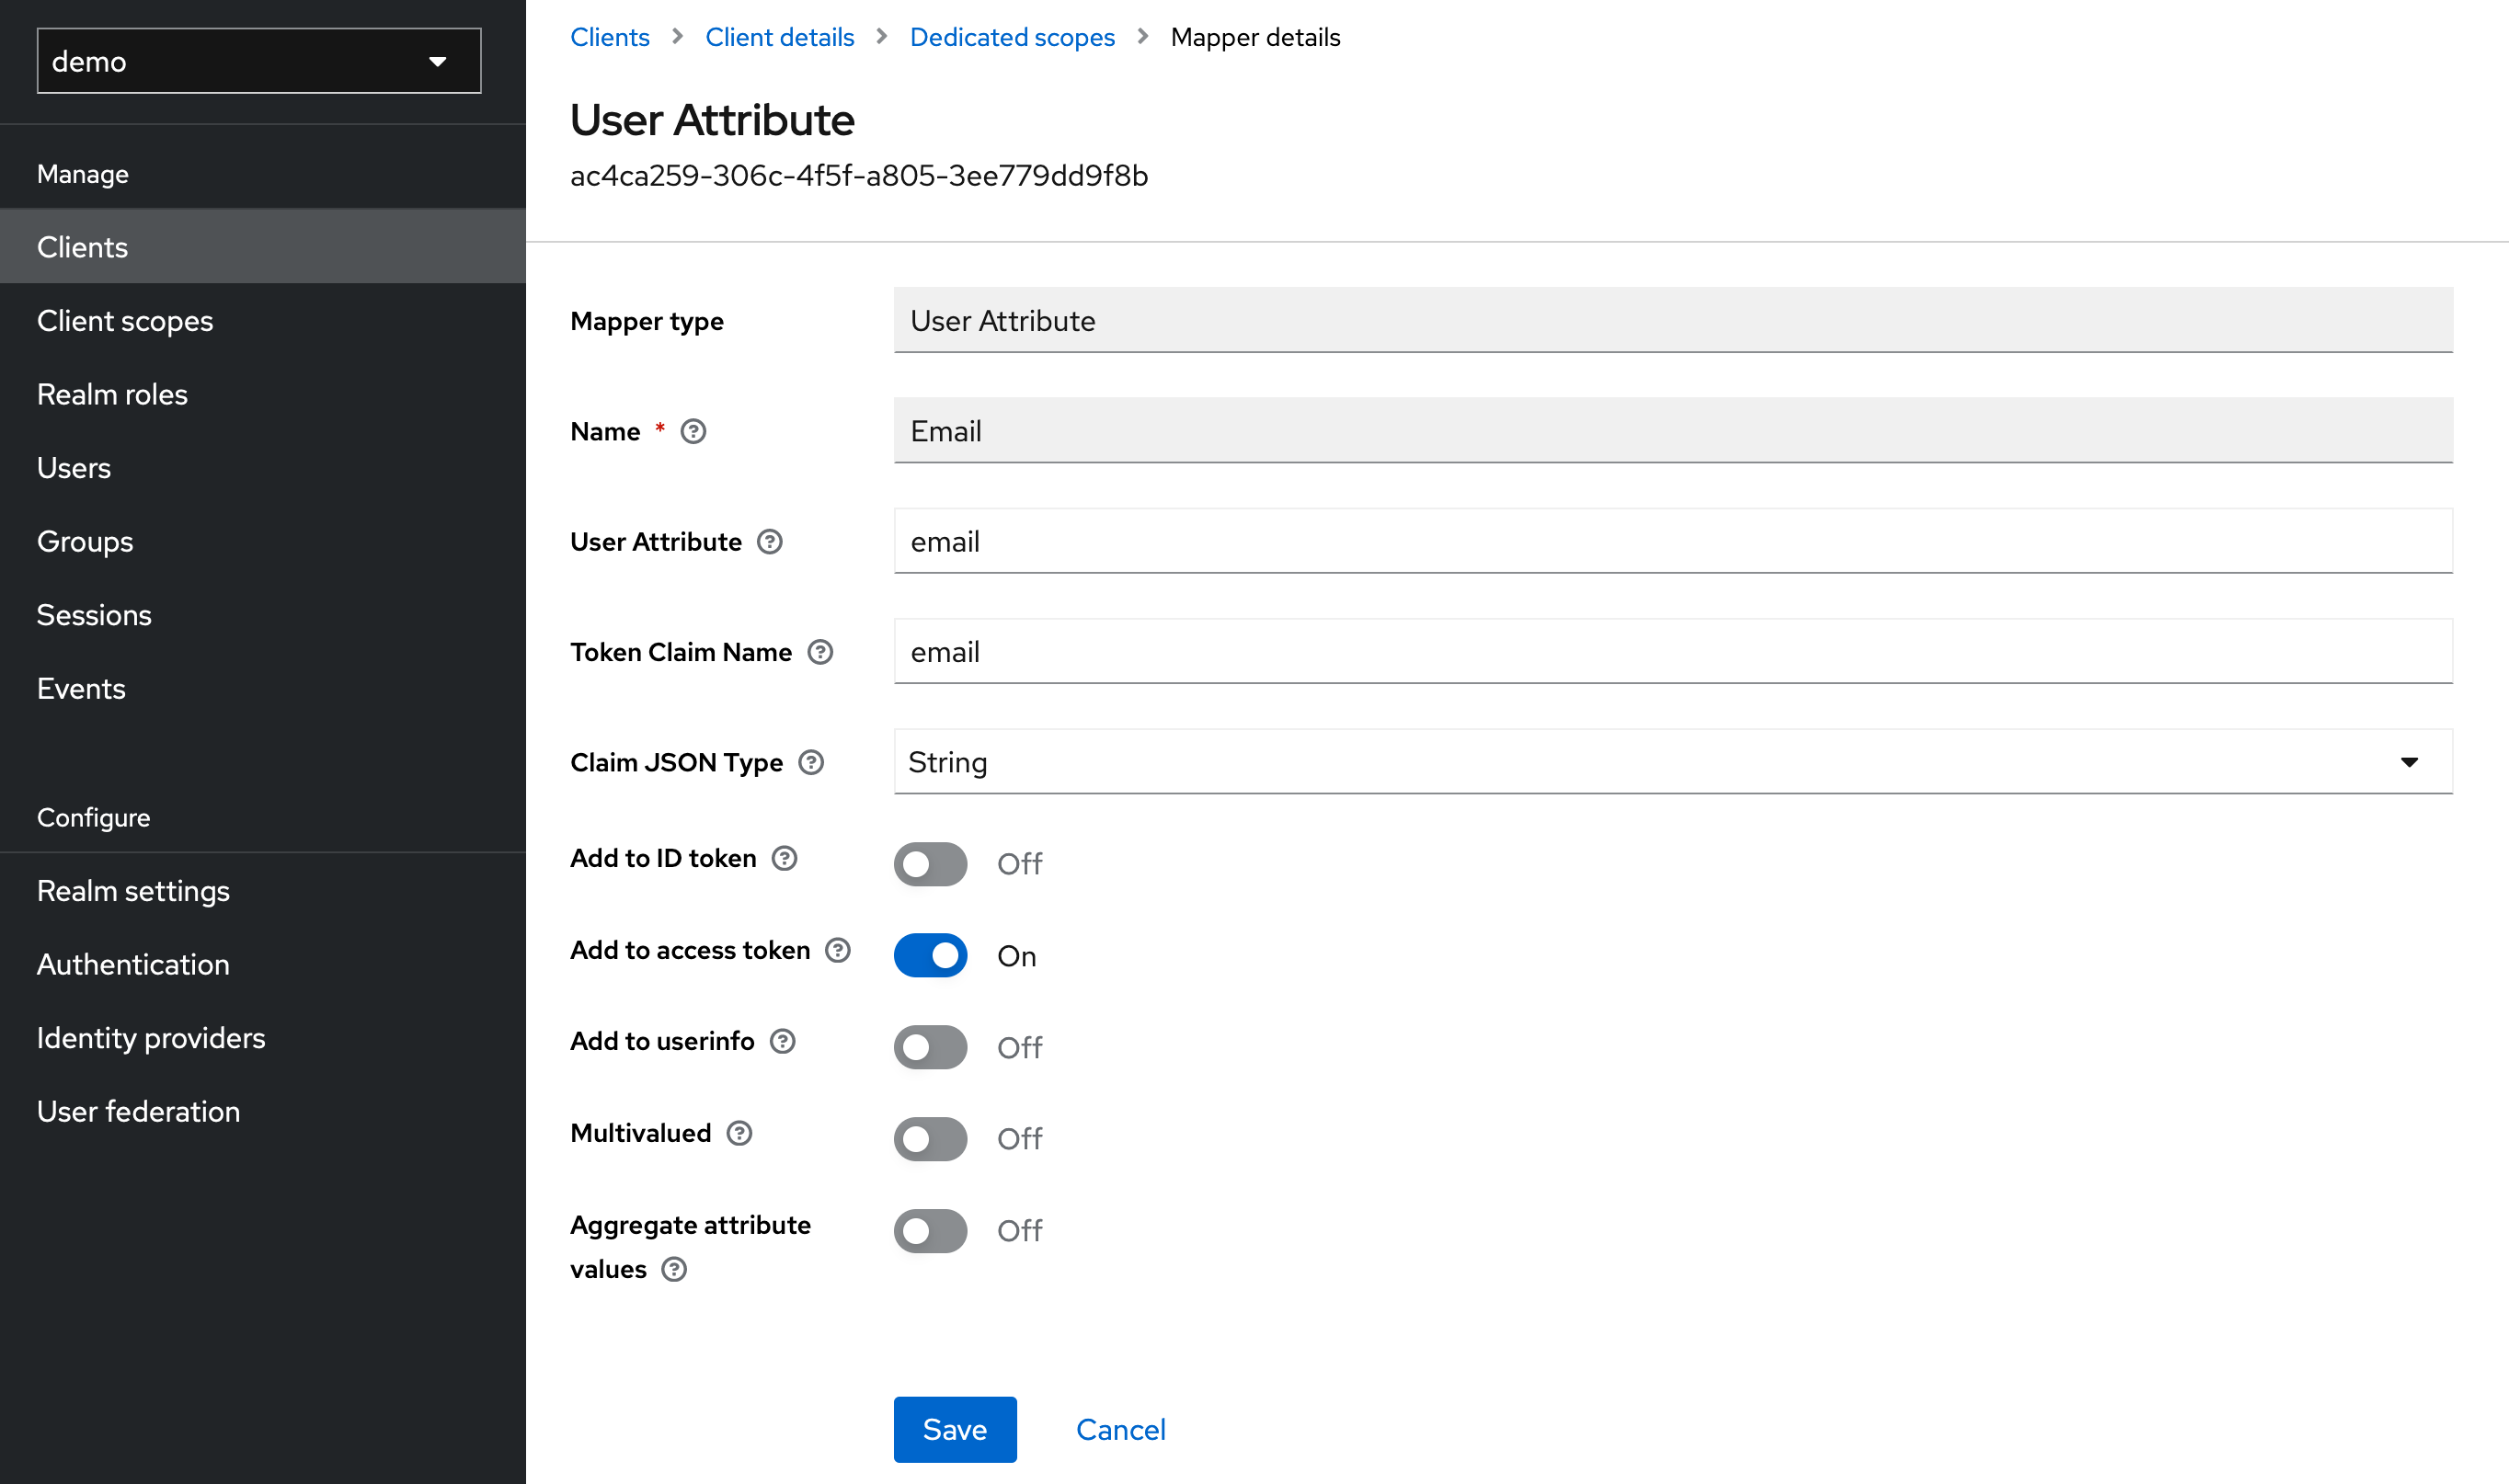
For the later user resolution, we want the email address of the user to be written into the access token. For this purpose, a corresponding mapper must be created. This can be done under Clients > MyClient > Client Scopes > MyClient-dedicated > Configure a new mapper (for this mapper to work the user must have an email configured).
Step 4: Test
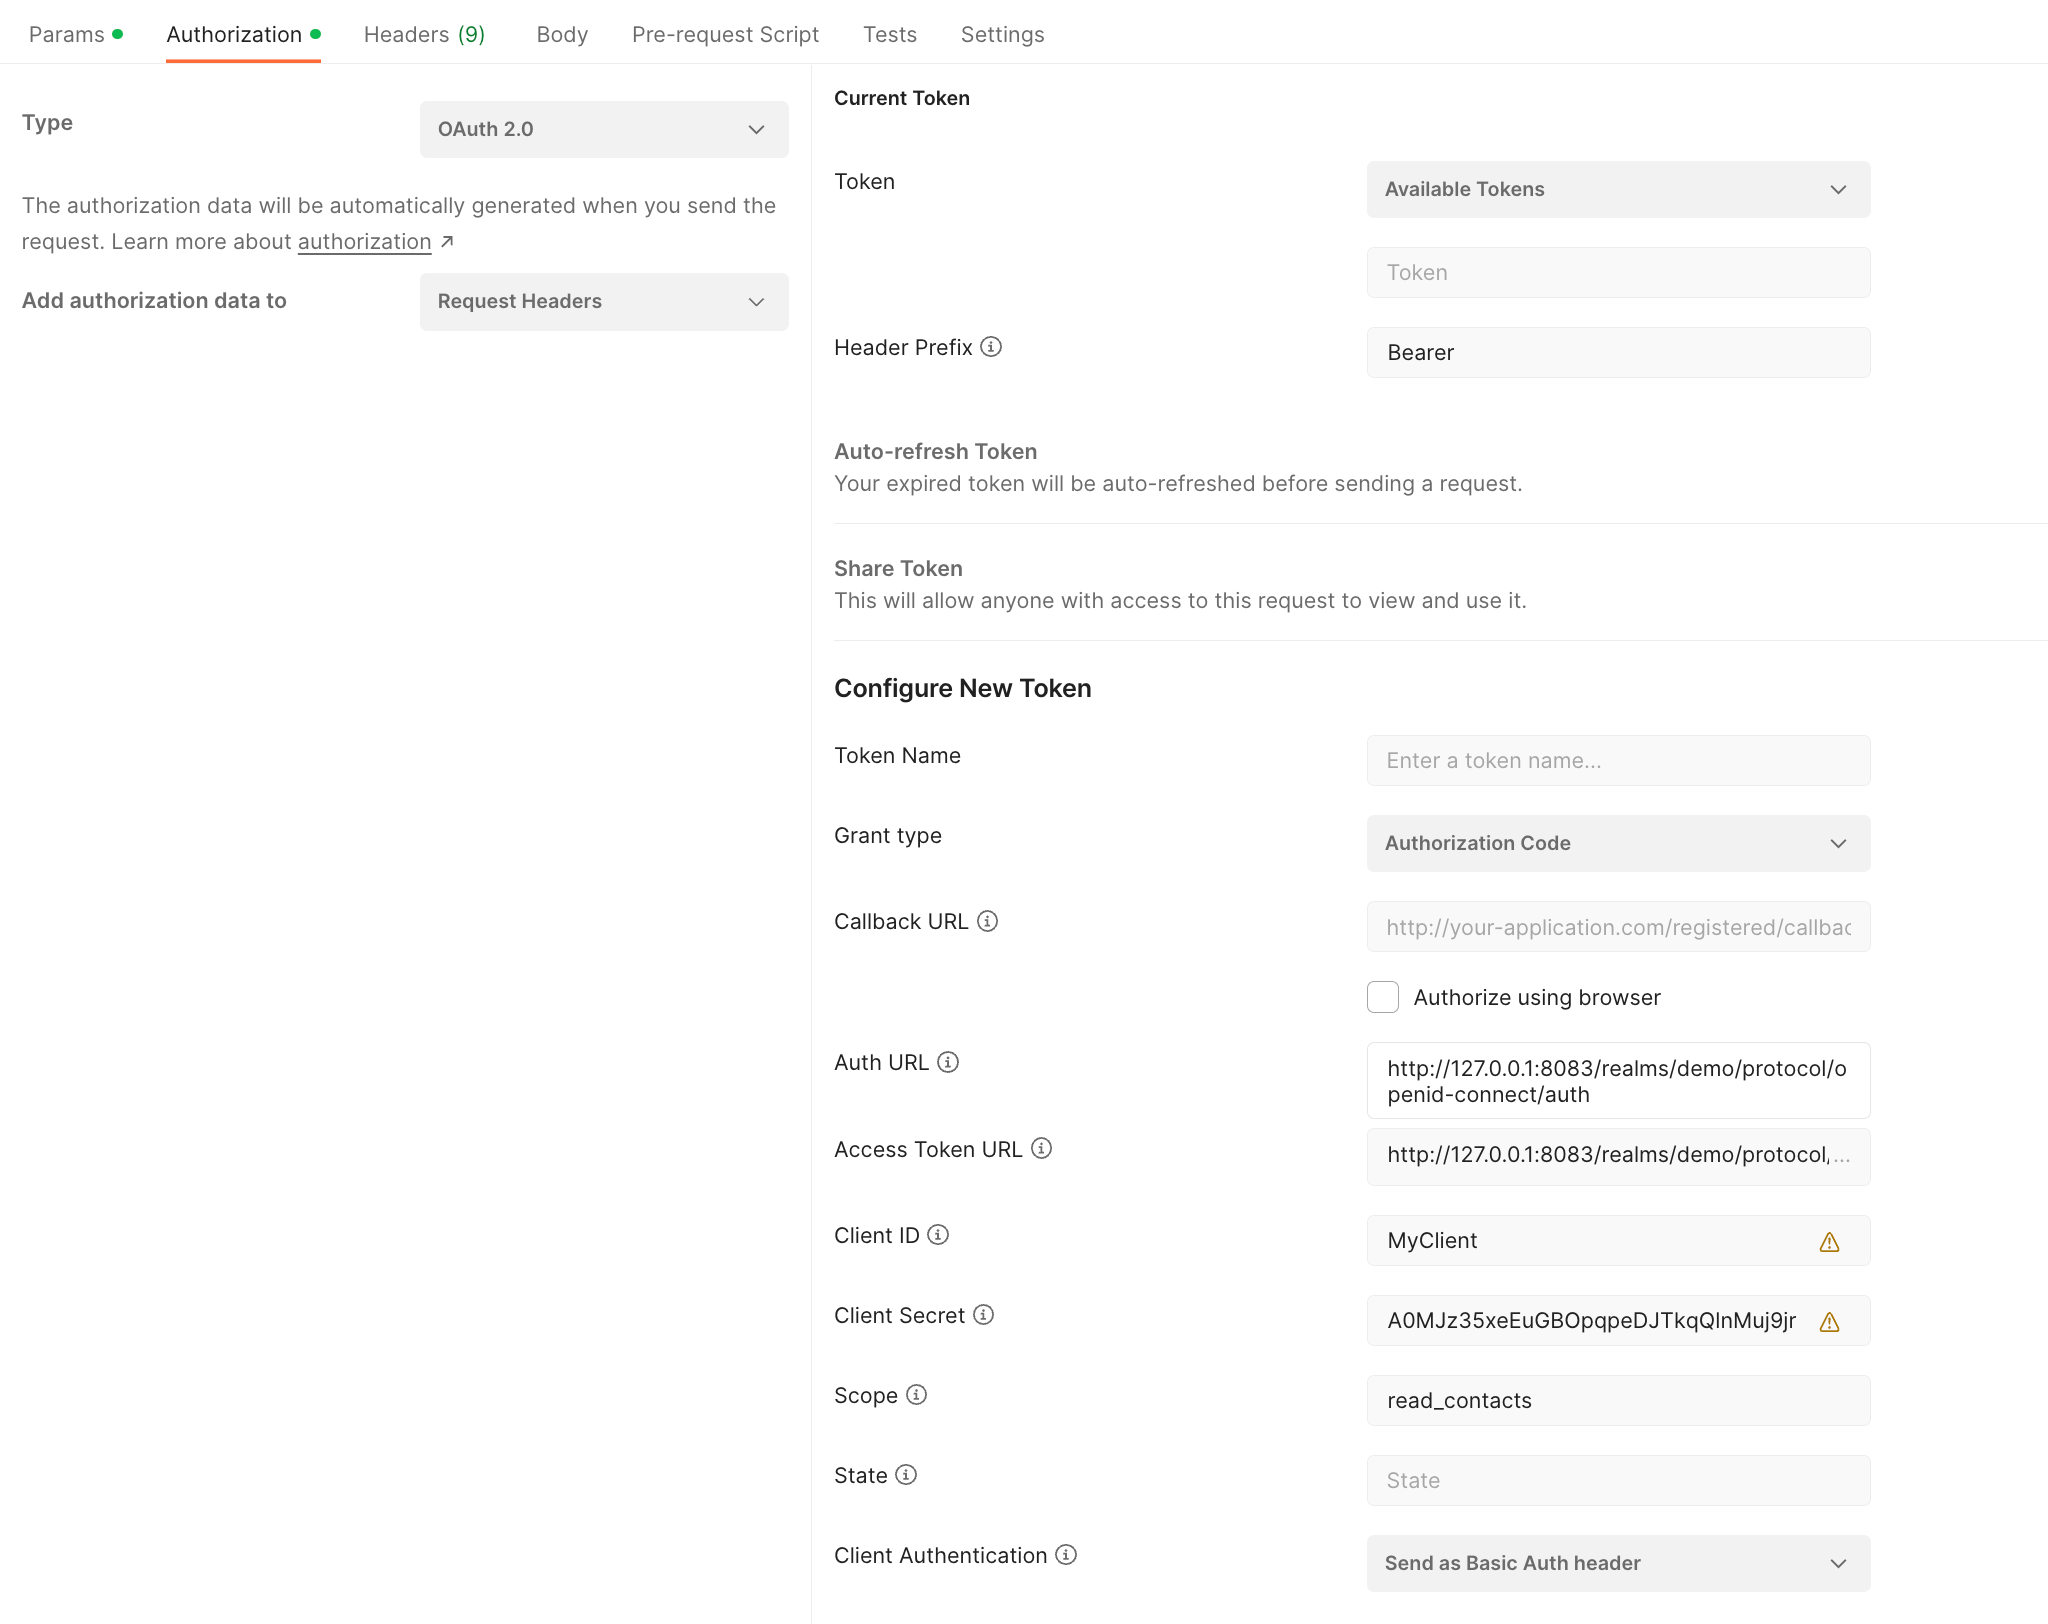
For our simple test, we use Postman. After we have created a new request, the path is not important at this point; we can request a new token under the item Authorization. For this, the displayed fields must be filled out according to your configuration.
As a small hint you can see the endpoints provided by Keycloak at the following URL (host and port may need to be adjusted): http://127.0.0.1:8083/realms/demo/.well-known/openid-configuration
Available APIs
HTTP JSON API
With OAuth, you can access a subset of the existing HTTP API. There are a few differences to the existing API documentation you have to keep in mind:
The session parameter must be omitted for every request. Instead, the access token must be provided as authorization header:
Authorization: Bearer 0062a74e65a74cefb364dcd17648eb04In addition to the normal error handling every call may also result in a specific OAuth error response. Possible errors are:
Missing/invalid access token: No access token was provided or the provided one is invalid. The response follows the scheme defined in RFC 6750, section 3. Example:
HTTP/1.1 401 Unauthorized
WWW-Authenticate: Bearer realm="example",
                  error="invalid_token",
                  error_description="The access token expired"
Insufficient scope: You cannot perform this call because the OAuth grant does not include a required scope. Example:
HTTP/1.1 403 Forbidden
Content-Type: application/json;charset=UTF-8

{
  "error": "insufficient_scope",
  "scope": "write_contacts"
}
Invalid request: The request was considered invalid from an OAuth perspective. Example:
HTTP/1.1 400 Bad Request
Content-Type: application/json;charset=UTF-8

{
  "error": "invalid_request",
  "error_description": "Some detailed description relevant for client developers."
}
Find the OAuth-enabled modules and actions below. Every action is bound to a specific scope. However, some actions are available implicitly if access to any scope is granted. E.g., you may always request a user's details or configuration if any kind of OAuth access is granted, but you may only change a user's configuration, if the write_userconfig scope is granted. The granted scope always limits the view on the folder tree. E.g., if you were granted read_contacts you can also perform all read-only requests that target contact folders. In turn, you may only create/modify/delete contact folders if obtained the write_contacts scope.
More detailed information about the required scopes for each action can be found in the HTTP API documentation.
| Module | Scopes |
|---|---|
| config | write_userconfig |
| folders | <depends> |
| mail / mailcompose / mailfilter/v2 | read_mail, write_mail |
| calendar / chronos | read_calendar, write_calendar |
| contacts / addressbooks | read_contacts, write_contacts |
| infostore / files / fileaccount / fileservice | read_files, write_files |
| drive | read_drive, write_drive |
| tasks | read_tasks, write_tasks |
| reminder | read_reminder, write_reminder |
| snippets | write_userconfig |
| user/me | <any> |
| import | write_calendar, write_contacts, write_tasks |
| export | read_calendar, read_contacts, read_tasks |
| attachments | read_contacts, write_contacts, read_calendar, write_calendar, read_tasks, write_tasks |
| pns | read_calendar, read_mail |
Card- and CalDAV
If installed, the interfaces for Card- and CalDAV are also available via OAuth. Clients can notice it based on the WWW-Authenticate headers of responses to unauthorized requests. If OAuth is supported, a header declaring Bearer as supported auth scheme will be present. The according scope values are carddav and caldav. The interfaces support OAuth natively, so there is no extra servlet path or the like.
